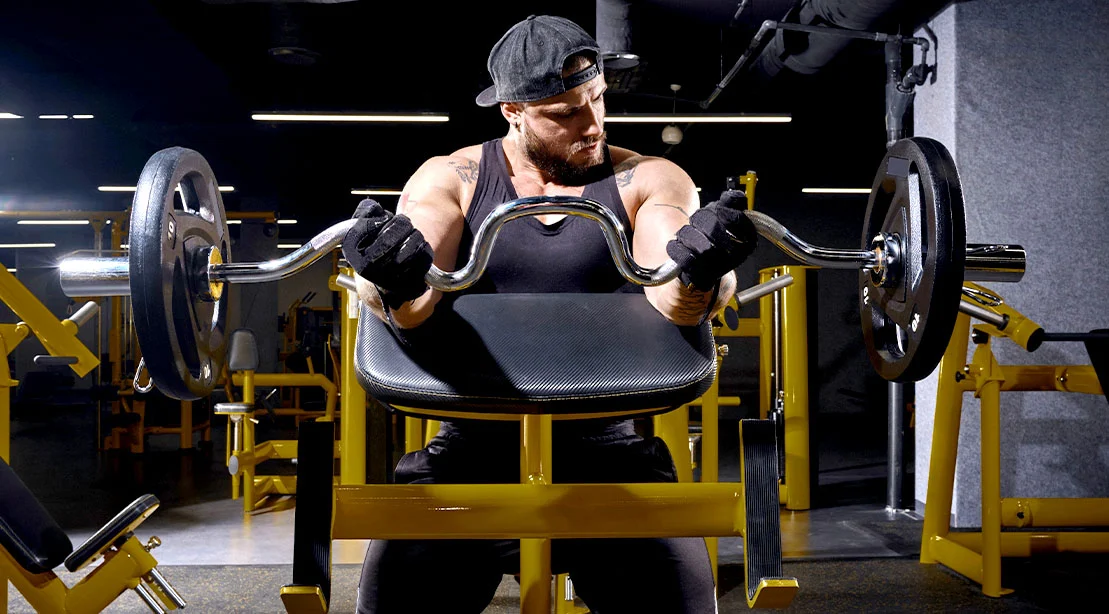
The preacher curl is widely regarded as the gold standard for biceps isolation. By locking the upper arms into a fixed position against a pad, the exercise effectively removes momentum and auxiliary muscle groups from the equation, forcing the biceps to shoulder the entire burden of the load. However, the efficacy of the preacher curl is rarely dictated by the weight on the bar; instead, it is a product of precision, biomechanical alignment, and meticulous setup.
While many gym-goers view the preacher curl as a simple "grip and rip" movement, seasoned strength coaches recognize it as a technical exercise that demands strict adherence to form. Whether you are utilizing an EZ-curl bar, a straight Olympic bar, or a specialized machine, the underlying principles of anatomical isolation remain constant. This guide breaks down the essential protocol for optimizing your preacher curl, ensuring that every repetition contributes to maximal flex time and mechanical tension.
The Fundamentals: Why Setup Dictates Growth
In the world of hypertrophy training, "time under tension" (TUT) is the primary driver of muscle growth. The preacher curl is uniquely designed to maximize this by placing the biceps in a stretched position at the bottom of the movement and requiring peak contraction at the top. When the setup is flawed, this tension is dispersed across the shoulders, back, or wrists, diluting the stimulus to the target muscle.
Chronology of a Perfect Repetition
To achieve optimal results, the movement must follow a rigid sequence:
- Preparation: Aligning the body to the apparatus to ensure zero mechanical leakage.
- Engagement: Establishing pre-tension in the biceps before the weight leaves the bottom position.
- Execution: Moving the load through a controlled range of motion where the elbow remains the sole pivot point.
- Terminal Contraction: Reaching the peak of the movement without compromising shoulder posture.
- Eccentric Control: Lowering the weight with intentional resistance to maximize fiber recruitment.
Step-by-Step: The Preacher Curl Checklist
1. The Foundation: Seat and Pad Calibration
Before you even consider your grip, you must calibrate the bench to your anthropometry. If the pad is too low, you will reach downward, causing your shoulders to round. If it is too high, you will struggle to keep your triceps anchored.
- Internal Cue: "Glue the upper arms to the pad."
- External Cue: "Position your armpits firmly against the top edge of the pad."
- Coach’s Tip: Perform a "dry" test. Straighten your arms fully and lightly contract your biceps. If your upper arms slide or shift, adjust the seat height until you feel like you are locked into the apparatus.
2. Establishing a Kinetic Base
A common mistake is the failure to engage the lower body. While your arms are the focus, your legs act as the stabilizer for your entire torso. If your feet are loose, your core will sway, leading to a loss of tension.
- Internal Cue: "Rooted from the floor up."
- External Cue: "Drive your feet into the ground to create a rigid platform."
- Coach’s Tip: If you notice your torso moving to assist the curl, the weight is likely too heavy. Lower the resistance until you can execute the movement without using your lower body as a counterbalance.
3. Grip Dynamics and Hand Positioning
The grip serves as the bridge between your nervous system and the weight. Using an EZ-curl bar is often preferred for comfort, as it reduces supination stress on the wrists, but the intensity remains the same.
- Internal Cue: "Crush the handle to activate the forearms."
- External Cue: "Pull the bar apart."
- Coach’s Tip: Imagining that you are attempting to physically widen the bar as you curl will naturally engage the biceps and keep the elbows from flaring outward, which protects the joint.
4. Shoulder and Elbow Integrity
The biceps cross both the elbow and the shoulder joints. To isolate the muscle properly, you must keep the shoulder joint stationary. Once the shoulder begins to move or the elbows lift off the pad, you are no longer performing a pure preacher curl; you are performing a hybrid movement that recruits the anterior deltoids.

- Internal Cue: "Keep the elbows ‘at home’ on the pad."
- External Cue: "Pin your triceps down as if they are held by magnets."
- Coach’s Tip: If your elbows lose contact with the pad at the top of the rep, you have reached your functional range of motion for that specific load. Stop there rather than pushing further and engaging the shoulders.
5. Pre-Tension: The "Dead Stop" Trap
Many lifters allow the weight to rest at the bottom, completely relaxing the biceps. This is a missed opportunity. You should never "rest" at the bottom of a preacher curl.
- Internal Cue: "Load the biceps before the movement begins."
- External Cue: "Take the slack out of the cable or bar."
- Coach’s Tip: Apply a small amount of upward force to the bar before the lift actually commences. This "pre-load" ensures that the muscle fibers are already firing when the rep begins.
Supporting Data: The Impact of Proper Form
Research into EMG (electromyography) activity suggests that when the upper arm is stabilized (as in the preacher curl), the biceps brachii experiences significantly higher activation compared to standing barbell curls, where the body can use "cheat" mechanics. However, this advantage is negated if the lifter fails to maintain a neutral cervical spine. Keeping your head in a neutral, forward-facing position prevents the rounding of the upper back, which is a common byproduct of intense effort.
Implications: Troubleshooting Common Errors
Even with a perfect setup, fatigue can lead to technical decay. Below are the most common pitfalls and their professional fixes:
- The "Shoulder Roll": Often occurs when the weight exceeds the capacity of the biceps. Fix: Pack the shoulder blades down and back. Think of your elbows as industrial door hinges—only the forearms should move.
- The "Dead Stop" Relax: Resting at the bottom increases the risk of elbow injury and decreases muscle engagement. Fix: Maintain a "soft" elbow lock at the bottom, never fully relaxing the joint or the muscle.
- Improper Seat Height: This is the most prevalent error. It causes the user to compensate by leaning forward or lifting their hips. Fix: Spend the extra thirty seconds to adjust the seat height before every set. It is an investment in your results.
Official Responses and Expert Consensus
Leading strength coaches and physical therapists generally agree: the preacher curl is a "high-risk, high-reward" movement. The high reward comes from the superior isolation it offers, while the risk lies in the potential for tendonitis if the elbow joint is not properly supported or if the weight is excessive.
"The preacher curl is a test of honesty," says one veteran strength coach. "When you are locked into the pad, you cannot lie to yourself about how much weight you can move. If you have to move your body to get the weight up, you aren’t training your biceps—you’re training your ego."
Final Thoughts: The Path to Biceps Greatness
The preacher curl remains one of the most effective tools for building the "peak" and overall mass of the biceps. However, its effectiveness is entirely dependent on the lifter’s willingness to prioritize form over load. By meticulously following the setup checklist—from seat calibration to pre-tension—you remove the variables that cause injury and stagnation.
When you master the setup, you eliminate the "cheat" and force the muscle to adapt. There is nowhere to hide on the preacher bench; the weight either moves because the biceps are working, or it stays still. Approach the movement with intention, respect the biomechanics of the elbow, and watch as your training volume translates into tangible, long-term growth. Consistent application of these principles will transform the preacher curl from a simple exercise into a cornerstone of your physique development.