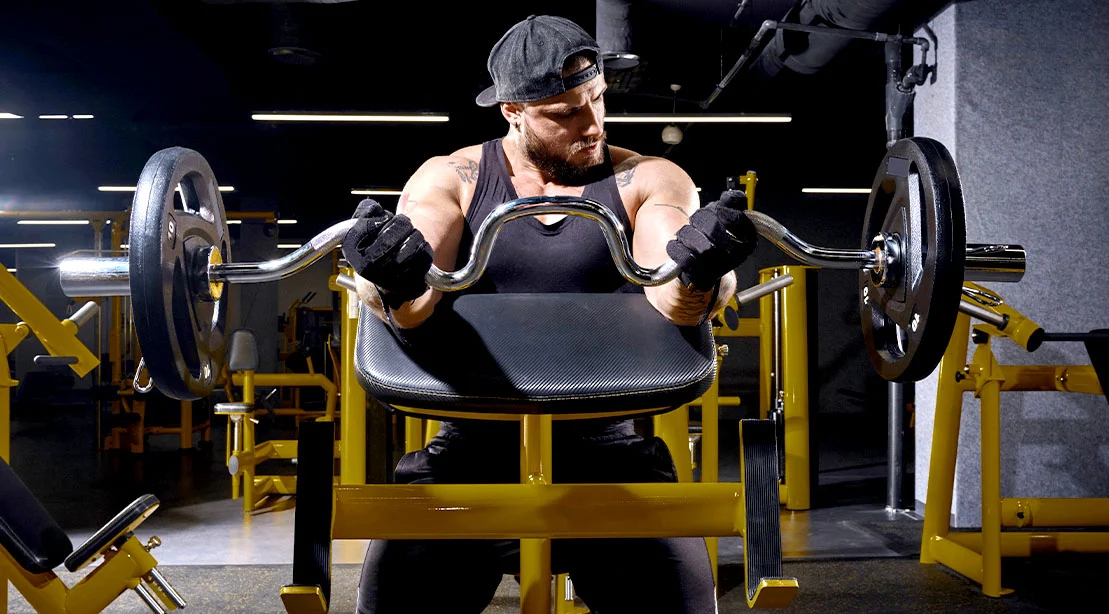
The preacher curl is a staple in the pantheon of bodybuilding, a movement so synonymous with arm development that it has remained a fixture in weight rooms from the Golden Era to the modern era. By fixing the humerus against a sloped pad, the movement effectively isolates the biceps brachii, stripping away the ability to use momentum or "body English." However, despite its simplicity, many gym-goers fail to extract the full potential from the exercise.
The preacher curl is only as effective as the integrity of its setup. It is not merely about sitting down and moving weight from point A to point B; it is a tactical exercise in creating mechanical tension while eliminating compensatory movement. Whether you are wielding an EZ-curl bar, a straight bar, or utilizing a machine, the fundamental principles of biomechanical alignment remain constant.
The Anatomy of Isolation: Why Setup Matters
The biceps brachii’s primary function is elbow flexion. When we perform standing barbell curls, the shifting position of the elbows often recruits the anterior deltoids and momentum from the lower body. The preacher curl negates this, but it introduces a new variable: the "flex time" under tension.
By locking the upper arms into a fixed position, you force the biceps to work through a full range of motion without the assistance of the shoulders. If the setup is flawed—if the armpits are too high, the feet are unstable, or the core is soft—the biceps lose their mechanical advantage. This guide breaks down the clinical approach to the preacher curl, ensuring that every repetition serves the singular goal of muscle hypertrophy.
Chronology of a Perfect Rep: The 6-Step Setup Checklist
To optimize the preacher curl, one must treat the setup as a precursor to the set itself. Much like a powerlifter prepares their bracing before a deadlift, the bodybuilder must prepare their posture before a curl.
1. The Foundation: Adjusting the Seat and Pad
Before your hands touch the steel, the equipment must be modified to your anthropometry. If the seat is too low, your chest will collapse over the pad, shortening the biceps’ range of motion. If it is too high, you will be fighting the angle of the pad rather than the weight.
- The Goal: Your armpits should rest snugly at the top edge of the pad.
- Coach’s Tip: Perform a "dry" test. Straighten your arms fully and perform a light isometric contraction. If your upper arms slide or shift, the height is incorrect. Your humerus must remain "glued" to the pad throughout the entire eccentric and concentric phases.
2. Establishing the Base of Support
A common mistake is treating the lower body as an afterthought. However, your feet are your anchor. If you are shifting your weight or rocking on the bench, you are dissipating the force intended for your arms.
- The Strategy: Drive your feet firmly into the floor. This creates a kinetic chain that stabilizes the torso.
- The Diagnostic: If you find your hips lifting off the seat or your feet dancing, the load is too heavy. The preacher curl is not a test of ego; it is a test of isolation. Lower the weight until your lower body is as still as the pad itself.
3. Precision Grip: The Tension Connection
The way you grip the bar determines the neurological drive to the muscle.
- The Technique: "Crush" the bar. By actively squeezing the handle, you initiate irradiation—a phenomenon where the tension in the hands increases the recruitment of the target musculature.
- External Cue: Visualize pulling the bar apart as you curl. This subtle tension helps keep the elbows tracked correctly and reduces the stress on the wrist joints, particularly when using an EZ-curl bar.
4. Locking the Joints: Shoulder and Elbow Stability
The shoulders and elbows are the "hinges" of the exercise. If the shoulders roll forward or the elbows flare, the triceps and deltoids will attempt to take over the load.
- The Fix: Keep the shoulders packed—down and back. Think of your elbows as stationary pivots. They should not lift off the pad even at the peak of the contraction. If the elbows rise, you have reached failure; do not attempt to "cheat" the rep by lifting the elbow.
5. Pre-Tension: Taking the Slack Out
The bottom position of the preacher curl is often a "dead zone" where people rest. This is a mistake.

- The Action: Before you begin, take the "slack" out of the cable or the bar. Pull up just enough to engage the biceps so they are under tension before the rep starts. This prevents the "jerk" at the beginning of the movement, which is where most tendon injuries occur.
6. Cervical Neutrality: The Head and Neck
It sounds trivial, but neck position affects spinal alignment. Looking down at the weight causes the thoracic spine to round, which pulls the shoulders out of alignment. Keep your eyes forward and your jaw relaxed to maintain a neutral spine.
Supporting Data: The Impact of Proper Form on Hypertrophy
Research in electromyography (EMG) consistently shows that when the humerus is stabilized (as in the preacher curl), the recruitment of the biceps brachii reaches its peak. However, EMG data also highlights that the moment the elbow moves from the pad, the biceps’ activation percentage drops significantly as the brachioradialis and anterior deltoids compensate.
By adhering to the "glued-elbow" protocol, lifters increase the time under tension (TUT). For hypertrophy, a rep lasting 3 seconds on the way down (eccentric) and 1 second on the way up (concentric) provides the optimal stimulus for protein synthesis.
Official Perspectives: Addressing Common Failures
Top-tier strength coaches agree that the preacher curl is frequently misused. The most common "official" complaints regarding the movement involve:
- The "Forward Roll": When the load exceeds the capacity of the biceps, the lifter rolls the shoulders forward to finish the rep. This turns a biceps exercise into a partial front-delt raise.
- The "Dead Stop" Trap: Letting the weight pull the arms into complete extension and "resting" at the bottom places unnecessary strain on the distal biceps tendon. Professional advice dictates maintaining a slight, micro-flexed tension at the very bottom of the rep to protect the joint.
Implications for Your Programming
What are the long-term implications of perfecting this setup? Primarily, it allows for "progressive overload" without the risk of injury. When your form is perfect, you can track your strength gains accurately. You are no longer guessing if your increase in weight is due to better technique or better strength; you are measuring pure muscle output.
Furthermore, by mastering the preacher curl, you develop a "mind-muscle connection" that carries over to other isolation exercises. The ability to isolate a muscle group while keeping the rest of the body rigid is the hallmark of an advanced trainee.
Troubleshooting the "Isolation" Breakdown
If you are still struggling to feel the burn in your biceps, revisit the "Three Pillars of Correction":
- The Seat Adjustment: If you aren’t feeling it, your armpits likely aren’t aligned.
- The Elbow Integrity: If the elbows are drifting, you are using too much weight. Strip 10-15% of the weight off the bar and focus on the "squeeze" at the top of the movement.
- The Eccentric Control: The most effective way to grow is the lowering phase. If you are dropping the weight, you are missing 50% of the stimulus. Fight the weight on the way down for at least 2-3 seconds.
Final Thoughts: The Purity of the Preacher
The preacher curl remains a brutal, honest assessment of arm strength. There is nowhere to hide on the pad. When you strip away the momentum, the body English, and the ego-lifting, you are left with the raw capability of your biceps.
By implementing this checklist, you move from "lifting weight" to "training muscle." Master the setup, control the tempo, and the results—in the form of increased bicep peak and thickness—will inevitably follow. The preacher curl isn’t just an exercise; it’s a discipline. Treat it with the respect it requires, and your arms will respond in kind.